Inspiration Lab - Sound Recording
Welcome to the Inspiration Lab's Recording Studios. This is a guide on how to use our studios to record audio such as:
- Podcasts
- Vocals
- Instruments and bands
- Voiceovers
- Audio Narration
View Information about Sound Booths 1, 2 and 4
View Information about the Live Room


Recording Studios
The Inspiration Lab features 5 professional recording studios. They are soundproofed and acoustically treated to make excellent quality recordings. These are our studio options:
Sound Booths 1, 2, and 4:
We have 3 bookable Sound Booths. They are 5 x 7 foot audio recording studios. There is room for one or 2 people and their basic equipment.
By default, your Sound Booth booking will include:
- 2x Shure SM58 dynamic vocal microphone
- 2x desk-mounted Rode boom arms
- 2x Studio MDR-ZX110 Sony headphones
- 1x Scarlett Focusrite 18i8 Interface (4 channels)
- 1x high powered Desktop Computer with audio recording software
The Live Room
The Live Room, (or studio 3) is very similar to the Sound Booths, only bigger, facilitating larger groups and more equipment! It is a 7 x 11 foot recording studio. The space is designed for up to 6 people.
By default, your Live Room booking will include:
- 2x Shure SM58 dynamic vocal microphone
- 2x desk-mounted Rode boom arms
- 2x Studio MDR-ZX110 Sony Headphones
- 1x Scarlett Focusrite 18i8 Interface (4 channels)
- 1x set of Behringer MS40 Studio Monitors
The Terry McBride Recording Studio
The Terry McBride Recording Studio is our largest studio at 11 x 16 feet, and can be used by groups of up to 8 people. It is used primarily as a video recording studio, but can also be used for larger scale audio projects like band or large podcast productions. The Terry McBride also has a connected producer space called the Control Room.
Available are our tripod and camera, LED light kits, green screen, and any microphones you need. See our Video Recording guide for more information on our video gear.
By default, your Terry McBride Recording Studio booking will include:
- 2x Studio MDR-ZX110 Sony Headphones
- 1x Scarlett Focusrite 18i20 Interface (8 channels)
- 2x set of Behringer MS40 Studio Monitors
- 1x Behringer 4 Channel Headphone Amp
- 1x Intercom unit
- There is a host of LED lighting, green screen, camera and additional mics that can also be added to your booking
The Inspiration Lab is open during regular Central library hours.
Reserve a recording studio or drop in to use a computer workstation. If this will be your first time booking or you need a refresher on the process, review our booking instructions.
Recording Software
The following is a list and short description of the audio recording software we have in the Inspiration Lab:
FL Studio 20

FL Studio is a full-featured music production environment DAW software capable of multi-track audio recording, sequencing and mixing for the creation of professional quality music tracks.
FL Studio is and has been used by many well known artists / hip hop and EDM producers, including Alan Walker, Soulja Boy, Avicii, and Deadmau5.
With FL Studio, you can:
- make beats and drum tracks
- create any genre of music from scratch (hip hop, EDM, Lofi, Rock, Classical etc.)
- make multi-track audio recordings for bands or podcasts
- create MIDI recordings with a MIDI keyboard
- edit, mix and add effects to audio
- master and export songs, podcasts or any other audio projects.
FL Studio is a paid software, but is available for free use at VPL's Inspiration Lab, inside our recording studios or at our Creation Stations.
FL Studio integrates with our MIDI keyboards (also coming soon!), also available for free use in our studios and Creation Stations.
For more information about FL Studio, check out our FL Studio guide.
REAPER

REAPER is a high powered digital audio workstation software. It is available for use in all of the Inspiration Lab's recording studios and on the Creation Stations used for editing.
REAPER is our flagship software and is amazing at recording and editing:
- vocal performances
- musical instruments
- multitrack band performances
- multitrack podcasts
For more information on REAPER check out our REAPER guide.
Audacity

Audacity is a free, easy-to-use, multi-track audio editor and recorder. It is available for use in all of the Inspiration Lab's recording studios and editing stations. You can use Audacity to:
- Record live audio
- Record computer playback
- Convert cassette tapes
- Edit various types of audio files
- Cut, copy, splice or mix sounds together
- Apply audio effects
For more information, check out our Audacity Guide
Adobe Audition

Adobe Audition is an industry standard audio recording, mixing, editing and restoration software and is part of Adobe's Creative Cloud. Use it to create a podcast, rearrange songs, restore damaged audio, add some broadcast quality effects and so much more!
Adobe Audition is available on Creation Stations for editing. The only recording studio that you can use Adobe Audition in is the Terry McBride Recording Studio.
Additional Bookable Equipment
Microphones
In addition to the default mics your booking may come with, these microphones are available upon request when making your booking, space and availability permitting.
Rode NT1-A Cardioid Condenser Mic
Professional quality condenser microphone that produces clear, warm sounding recordings
SHURE SM7B Dynamic Vocal Microphone
A classic professional dynamic microphone that is exceptionally clean for both music and speech.
Behringer C3 - Dual Diaphragm Studio Condenser Mic
Professional quality condenser microphone that can capture your sounds with one of 3 different selectable pickup patterns (cardioid, omnidirectional and figure eight)

Headphones and Studio Monitors
All studio comes equipped with 2 sets of studio headphones. You may request additional headphones as needed.
The Live Room and Terry McBride Recording Studio also include a set of Behringer MS40 Studio Monitors.
We have one floating pair of Presonus Eris E3.5 Studio Monitors that can be booked for use in our Sound Booths as well.

Instruments
Pyle PTED06 Electronic Tabletop Drum Machine - Digital Drumming Kit - NEW!!!
This tabletop electric drumkit with 100s of drum sounds is available to add to your booking. It can be recorded electronically, or with MIDI.

We also have MIDI keyboards and a MIDI drumpad. Find out about our MIDI Equipment here.
Microphone Setup - Recording Studios
Microphone Setup:
- If you have a booking in Sound Booths 1, 2, 4 or the Live Room, your booking will include two microphones that are already setup. All you will need to do is make sure Phantom Power button is turned on and the gain is set to about 12 oclock or halfway.
- If you requested additional microphones, staff will set them up before your booking starts.
- If you bring your own microphone, please do not disconnect our Lab Mics if at all possible. Please plug your XLR inputs into inputs 3 and 4 in the Interface.
- Ensure Phantom power is turned off before plugging in or unplugging a mic
Microphone Positioning:
- Microphones should be positioned 4 to 6 inches from sound mouth; if there is a very loud sound source such as a drum, you may put it even further.
- If using the SHURE mics, top of mic should point towards sound source. IF using the RODE mic, the front face of the mic should face the sound source.
- If using the Behringer C3 mic, select one of 3 pickup patterns with the switch on back of mic:
- Position 1: Cardioid - The Center Position and is sensitive to sound from directly in front of the microphone. Best for recording speech, individual instruments or vocals within a group.
- Position 2: Figure Eight - Left position and is sensitive to sound from directly in front AND behind. Best used for interviews or dialogue between two speakers.
- Position 3: Omnidirectional - Right position and is equally sensitive to sound from all directions. Best suited for sessions with several sound sources
- There are also 2 other switches on the C3
- Low Cut-Filter Switch - Keep this switch to the LEFT position to filter out low-frequency sounds such as rumbles, snapping, wind, etc.
- Signal Level Attenuation Switch: Keep this switch to the LEFT (0) unless you are recording high-pressure sounds like a bass drum.
Audio Interface Setup - Recording Studios
Interface Setup and Troubleshooting Tips:
Make sure phantom power is turned off while plugging in or unplugging a mic.
Make sure the input gain is on. The gain for the condenser mics should usually be at about 12.
Adjust as needed. Make sure the headphone volume dial is turned up so you can hear playback and monitoring.
- Is everything plugged in correctly?
- Is the Phantom Power ON?
- GAIN level high enough?
- Are you talking into the front of the mic?
- Is the Power ON?
- Headphones or speakers plugged in and turned up?
- In the software does it say "focusrite" for the mic and speaker? (input and output)
Focusrite Scarlett 18i8 (2nd Gen)
Sound Booths 1, 2, 4, and the Live Room.

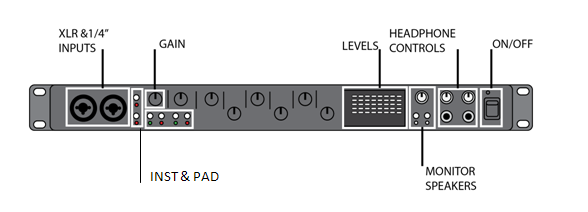
Inputs 1 to 4 – XLR Combo type input sockets – connect microphones and instruments using the XLR or ¼” jacks as appropriate. Direct connection of instruments should be via Inputs 1 and or 2.
48V Phantom Power – two switches enabling 48 V phantom power at the XLR contacts of the combo connectors, in pairs. ( 1&2, 3&4) The switch illuminates when phantom power is turned on. Please do not unplug the microphones or any instruments while phantom power is enabled.
Gain 1 to 4 – adjust the amount of incoming sound signal (gain) for each Input, 1 to 4 respectively. The gain knob shows green if an input level is at least -24 dBFS, and then turns red when the signal level reaches 0 dBFS, or when the signal peaks.
INST – the input configuration for the jack contacts at the inputs.
PAD – a 10 dB pad may be inserted in each of the four analogue input signal paths. You can access this from the Focusrite software controls.
USB LED - a green LED which illuminates when the unit is recognised by the computer to which it is connected.
MIDI LED – a green LED illuminates when MIDI data is received at the MIDI IN port.
Monitor – main monitor output level control – this is an analogue control and adjusts the level at Outputs 1 and 2 on the rear panel.
Mute – push this button to mute outputs 1 and 2.
Headphone outputs 1 and 2 – connect one or two pairs of headphones at the two ¼” inputs below the headphone volume controls 1 and 2.
Note: If you come to the studios and want to hook up your own laptop to the interface, you will have to install the driver: https://global.focusrite.com/downloads?product=Scarlett+18i8
Focusrite Scarlett 18i20 (2nd Gen)
Terry McBride Studio

Inputs 1 and 2 – combo type input sockets that can connect microphones, instruments or line level signals via the XLR or ¼” jacks as appropriate – Inputs 3-8 on the back panel.
48V – two switches enabling 48 V phantom power at the XLR contacts of the Combo connectors for mic inputs 1-4 and 5-8 respectively. The switches each have an associated red LED indicating that phantom power is selected. Please do not unplug the microphones/instruments when phantom power is enabled.
Gain 1 and 2 – adjust the sound signal (gain) for inputs 1 and 2 (these inputs are used for mics in the vocal booth 5).
INST – two switches changing the input configuration for the jack contacts at the Inputs 1 and 2.
PAD – two switches which insert a 10dB pad in the signal paths of inputs 1 and 2. With the pad applied the maximum input signal level is +16 dBFS. The switches each have an associated red LED indication that PAD is selected.
Gain 3 to 8 – adjust sound signal (gain) for Inputs 3-8 respectively. These inputs are for mics in the Terry McBride 6.
Input meters – eight 5 segment LED bar graph meters indicating the signal levels of the eight analogue input signals.
USB active LED – a green LED which illuminates when the unit is recognized by the computer to which it is connected.
Monitor – main monitor output level control: this can control the level at the main monitor outputs on the rear panel.
DIM and MUTE – two switches controlling the 18i20’s monitor outputs; DIM reduces the output levels by 18dB, while MUTE turns the outputs off.
Headphone volume 1 and 2 – connect one or two pairs of stereo headphones at the two ¼” TRS jack sockets below the controls.
POWER – AC power switch and LED.
Note: If you come to the studios and want to hook up your own laptop to the interface, you will have to install a driver.
Digital Library Resources
About the Inspiration Lab
The Inspiration Lab is a free space dedicated to digital creativity, collaboration, and storytelling. We are located on level 3 at the Central branch of the Vancouver Public Library.
The Inspiration Lab features recording studios, a high-performance computer lab with audio, video and image editing software, as well as graphic design, 3D animation and self-publishing software. We also have analog-to-digital conversion stations for various forms of older media.
All of our services are absolutely free with your library card!


